Tutorial ini serupa dengan yang dibuat oleh Dariusz Borowski yaitu membuat halaman login tetapi disini saya menggunakan netbeans 6.1.
Pertama, persiapkan semua peralatan tempur
1. JDK 6 update 5 http://java.sun.com/
2. netbeans 6.1 http://www.netbeans.org/ . i use netbeans DVD that include point 1 and 2
3. gwt4nb https://gwt4nb.dev.java.net/
4. GWT-ext 2.05 or later http://code.google.com/p/gwt-ext/
5. EXTJS 2.02 http://yogurtearl.com/ext-2.0.2.zip
Setelah peralatan terkumpul saatnya berperang
1. install JDK... sangat jelas bagaimananya
2. install netbeans... sangat jelas bagaimananya
3. install gwt4nb
ikuti langkahnya disini https://gwt4nb.dev.java.net/manual/quickstart.html
4. install GWT-ext
ekstrak ke to d:\ . dicontoh ini saya menggunakan ini.
Saatnya membuat project baru
creating new project ->Web -> Web Application

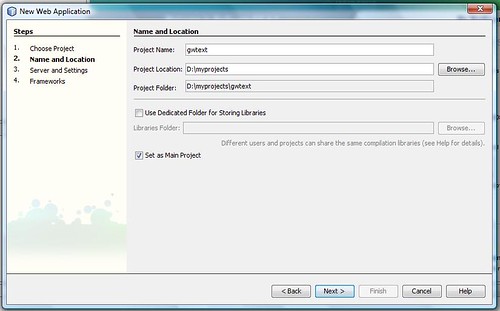
Klik Next, dalam contoh ini saya menaruh projectnya di d:\myprojects kemudian tuliskan "gwtext"
Klik Next,
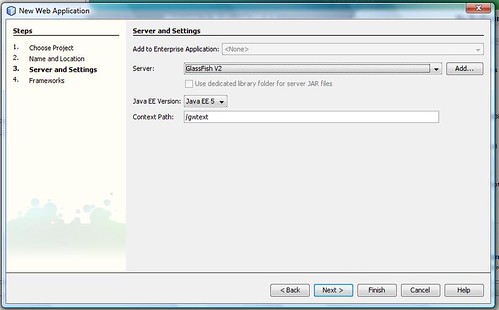
Klik Next,
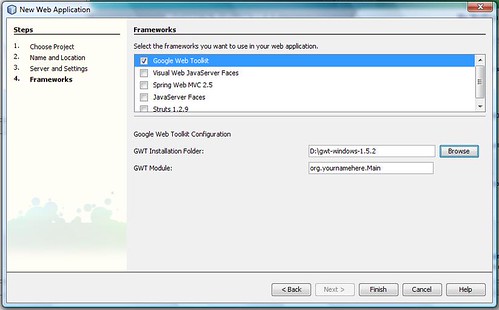
Pilih Google Web Toolkit sebagai framework lalu arahkan ke direktori penginstalan GWT. saya memilih nama modul GWT sebagai standar.

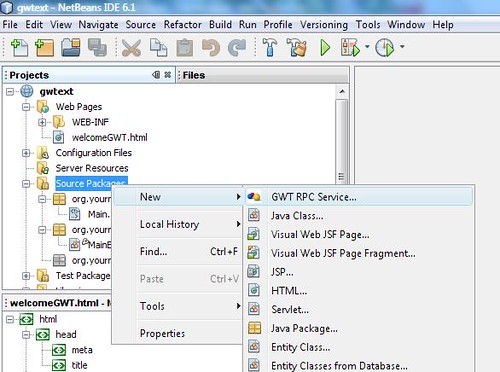
lalu akan terlihat projectnya telah siap. Sekarang membuat GWT RPC service. dengan klik kanan di "Source Packages" -> New -> GWT RPC Service....
lalu klik Next,
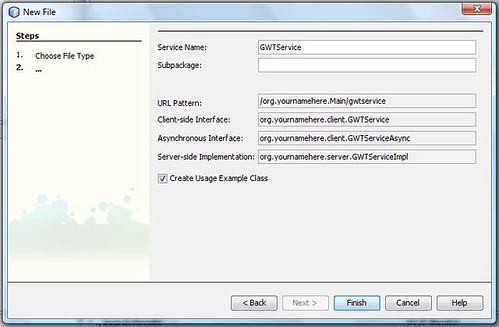
Hapuslah GWTServiceUsageExample.java dan pilih
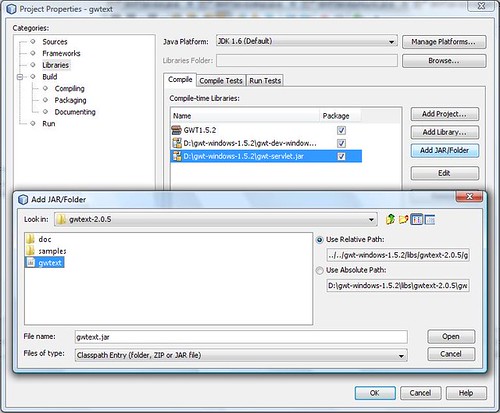
Setelah selesai,Sekarang tambahkan librari GWT-ext dengan melakukan klik kanan di projek "gwtext" lalu pilihlah properties. kemudian akan muncul Window seperti gambar dibawah. Lalu pilih Libraries, tambahkan Jar
lalu point to file gwtext.jar
Sekarang saatnya coding...
buka welcomeGWT.html didalam diagram pohon Web Pages.
ganti codenya menjadi
<!DOCTYPE HTML PUBLIC "-//W3C//DTD HTML 4.01 Transitional//EN">
<html>
<head>
<meta name="'gwt:module'" content="'org.yournamehere.Main=" main="">
<link rel="stylesheet" type="text/css" href="js/ext/resources/css/ext-all.css">
<script type="text/javascript" src="js/ext/adapter/ext/ext-base.js"></script>
<script type="text/javascript" src="js/ext/ext-all.js"></script>
<script language="javascript" src="org.yournamehere.Main/org.yournamehere.Main.nocache.js"></script>
<title>Main</title>
<div id="login_widget">
</body>
</html>
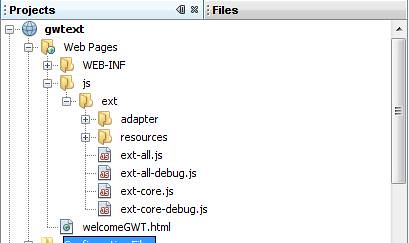
Kemudian salin librari extjs. Buatlah direktori js didalam diagram pohon Web Pages lalu salin extjs kedalamnya.
Lihatlah gambar dibawah.
Sekarang pindah ke Main.gwt.xml, Kamu akan menemukan dibawah paketorg.yournamehere
tambahkan teks ini
<inherits name="com.gwtext.GwtExt" />
setelah teks ini
<inherits name="com.google.gwt.user.User"/>
Gantilah berkas GWTservice.java dibawah paket client
package org.yournamehere.client;
import java.util.Map;
import com.google.gwt.core.client.GWT;
import com.google.gwt.user.client.rpc.RemoteService;
import com.google.gwt.user.client.rpc.ServiceDefTarget;
public interface GWTService extends RemoteService  {
public static final String SERVICE_URI = "/gwtservice";
   public static class Util {
      public static GWTServiceAsync getInstance() {
         GWTServiceAsync instance = (GWTServiceAsync) GWT.create(GWTService.class);
         ServiceDefTarget target = (ServiceDefTarget) instance;
         target.setServiceEntryPoint(GWT.getModuleBaseURL() + SERVICE_URI);
         return instance;
      }
   }
   public boolean userIsValid( Map loginData );
}
GWTserviceAsync
package org.yournamehere.client;
import java.util.Map;
import com.google.gwt.user.client.rpc.AsyncCallback;
public interface GWTServiceAsync {
   public void userIsValid( Map loginData, AsyncCallback callback );
}
MainEntryPoint.java
package org.yournamehere.client;

import java.util.HashMap;
import java.util.Map;
import com.google.gwt.core.client.EntryPoint;
import com.google.gwt.core.client.GWT;
import com.google.gwt.user.client.rpc.AsyncCallback;
import com.google.gwt.user.client.rpc.ServiceDefTarget;
import com.google.gwt.user.client.ui.RootPanel;
import com.gwtext.client.core.EventObject;
import com.gwtext.client.widgets.Button;
import com.gwtext.client.widgets.MessageBox;
import com.gwtext.client.widgets.Panel;
import com.gwtext.client.widgets.event.ButtonListenerAdapter;
import com.gwtext.client.widgets.form.Form;
import com.gwtext.client.widgets.form.FormPanel;
import com.gwtext.client.widgets.form.TextField;


public class MainEntryPoint implements EntryPoint {
private TextField fName = null;
   private TextField passWord = null;
   private Button loginButton = null;
   private Panel loginPanel = new Panel();
   private FormPanel formPanel = new FormPanel();
   public void onModuleLoad() {
      // call the async login service
      final GWTServiceAsync loginService = ( GWTServiceAsync )GWT
                              .create( GWTService.class );
      ServiceDefTarget endpoint = ( ServiceDefTarget )loginService;
      String moduleRelativeURL = GWT.getModuleBaseURL()+"gwtservice";
      endpoint.setServiceEntryPoint( moduleRelativeURL );
      this.setLoginPanel();
      final AsyncCallback callback = new AsyncCallback()
      {
         public void onSuccess( Object result ) {
            // take the result coming from the server
            boolean ok = Boolean.valueOf( result.toString() ).booleanValue();
            if( ok )
            {
               MessageBox.alert( "Success", "Successfully logged in!");
            }
            else
            {
               MessageBox.alert( "Invalid", "Wrong username or password");
            }
         }

         public void onFailure( Throwable caught ) {
            MessageBox.alert( "Error", "Error while logging in" );
         }
      };

      loginButton = new Button( "Login" );
      loginButton.addListener( new ButtonListenerAdapter() {
         public void onClick( Button button, EventObject e ) {
            Map loginData = getUserData( formPanel.getForm() );
            loginService.userIsValid( loginData, callback );
         }
      });
      formPanel.addButton( loginButton );
      loginPanel.setBorder( false );
      loginPanel.setPaddings( 5 );
      loginPanel.add( formPanel );
      RootPanel.get("login_widget").add( loginPanel );
   }
   // setup login panel
   private void setLoginPanel()
   {
      formPanel.setFrame(true);
      formPanel.setTitle( "Simple Login Form" );
      formPanel.setWidth(350);
      formPanel.setLabelWidth(75);
      formPanel.setUrl( "save-form.php" );
      fName = new TextField( "Username", "userName", 230 );
      fName.setAllowBlank( false );
      fName.focus();
      formPanel.add( fName );
      passWord = new TextField( "Password", "pswd", 230 );
      passWord.setInputType( "password" );
      formPanel.add( passWord );
   }
  // prepare data for sending to the server
   private Map getUserData( Form form )
   {
      String formValues = form.getValues();
      Map loginData = new HashMap();
      String[] nameValuePairs = formValues.split( "&" );
      for (int i = 0; i < nameValuePairs.length; i++) {
        String[] oneItem = nameValuePairs[i].split( "=" );
         loginData.put( oneItem[0], oneItem[1] );

      }
      return loginData;
   }
}
GWTServiceImpl.java
package org.yournamehere.server;
import java.util.Map;
import org.yournamehere.client.GWTService;
import com.google.gwt.user.server.rpc.RemoteServiceServlet;

public class GWTServiceImpl extends RemoteServiceServlet implements GWTService {
// Here it should be something more useful e.g. sending
// a request to LDAP server
   public boolean userIsValid( Map loginData )
   {
      boolean accepted = false;
      String name = loginData.get( "userName" ).toString();
      String pswd = loginData.get( "pswd" ).toString();
      if( name.equals( "guest" ) && pswd.equals( "guest" ) )
      {
         accepted = true;
      }
      return accepted;
   }
}
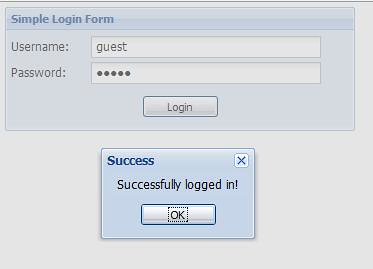
sekarang cobalah clean and build lalu run.....
gunakan username guest dan password guest
kalau berhasil kamu akan mendapatkan tampilan seperti berikut
Problem found on netbeans 6.1
after you install please update plugins especially plugin with category "base".
then when you try to build using default configuration error with "Exception in thread "main" java.lang.OutOfMemoryError: Java heap space"
you can fix temporary by add
this text
<jvmarg value="-Xmx512m" />
after
<arg value="${gwt.module}"/>
inside build-gwt.xml inside nbproject directory
or you can download org-netbeans-modulesgwt4nb modules to replace your current gwt4nb inside .netbeans/6.1/modules/